
The XML Guest Book was created to answer a need in ColdFusion community for a guest book application that was not linked to any database, but at the same time was as powerful as any guest book that uses database as a back-end storage solution. The storage of all guest book data is, as the application name suggests, done using multiple XML data files.
The aim of this short tutorial is to familiarize guest book owner with all common software functionality. This includes all options that can be configured on the XML Guest Book settings page. For information about how the XML Guest Book works under the hood, the reader is referred to programmer's notes, which can be accessed on companion web site.
XML Guest book futures:
The installation process for XML Guest Book is relatively simple when compared to most open source and commercial web applications available for ColdFusion on the market today. All that is required of the user is to unzip (uncompress) installation file to directory under his or her web site root. For details as to how to perform such operation user is directed to the documentation of the compression utility.
As an example, lets assume that web site http://www.mysample.com points to directory c:\Inetpub\wwwroot\mysample The guest book owner, Joe Sample, wants to install XML Guest Book to directory named guestbook. He creates directory called guestbook under c:\Inetpub\wwwroot\ Joe Sample uses his favorite un-compression utility to unzip the guest book installation file. When prompted for the unzipping path he types in c:\Inetpub\wwwroot\mysample\guestbook
Once the guest book is uncompressed to its destination folder the setup ends. That's it! There is nothing more to do. Administrator has to point to the directory where he or she installed the guest book and enjoy. Isn't that the easiest web application install procedure you ever experienced? This is made possible with some clever programming with you, the end-user in mind.
Lets take above example (with Joe Sample) a little bit further. Joe points to the page http://www.mysample.com/guestbook to view the default guest book page. The default administrative area password is "admin" (without quotes). To access administrative area Joe has to type into his browser window one of the following web addresses:
XML Guest Book doesn't need back-end database system to operate. All data that is needed by this application is stored in XML format under the data subdirectory. This web application requires the presence of ColdFusion MX server or higher either professional or enterprise edition (it will work fine on the development edition as well). The application needs access to data files, read and write access must be granted. ColdFusion server security is accessed through ColdFusion administrator. For more information about how to change security settings on your server, please contact Macromedia customer support. To find out what security settings are applied to your ColdFusion server, please contact your hosting company. Note that by default ColdFusion server doesn't have any security settings applied to it, thus XML Guest Book will work just find on a default installation of ColdFusion MX server (all editions).
The following user clients were tested with XML Guest Book and found to be compatible:
The following web browsers are not compatible with XML Guest Book:
XML Guest Book uses basic CSS that is supported by newer browsers. Guest book doesn't use any JavaScript. Cookies are used only for administrative area log in (session variable storage), they are not used for display of guest book messages (end-user doesn't need to have cookies enabled). If you find a browser not listed above that works (or not) with XML Guest Book please inform the author.
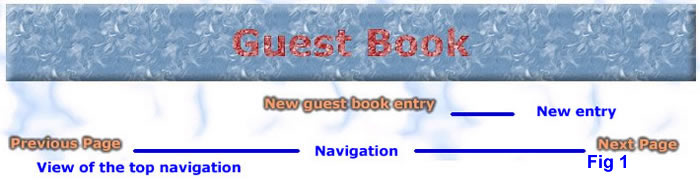
The main guest book window is what users see when they want to check your guest book out.
Users can surf all the entries placed in the guest book by its previous users using the handy navigation
icons located for user convenience both at the top [Fig 1] and bottom [Fig 2] of the web page.
The guest book entries are shown sorted according to preferences set by the guest book administrator. There are two sorting options, newer messages first and older messages first. The navigation is intuitive and should pose no problems to the end-user.
When the guest book administrator is logged into the system (it will be explained later on how to
do that) the top of the main guest book page changes to show more options [Fig 4].
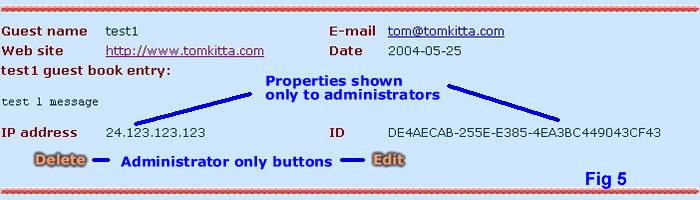
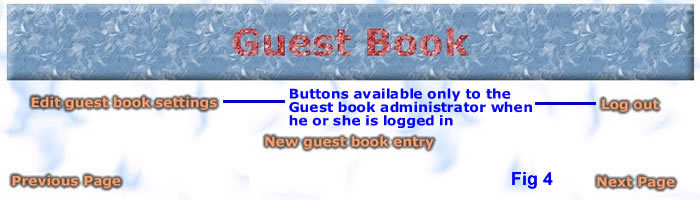 When guest book administrator is logged in he or she can also view additional properties of each guest book
entry, like IP address of the person who entered the particular message and message ID. There is also option to
edit and delete guest book entries [Fig 5].
When guest book administrator is logged in he or she can also view additional properties of each guest book
entry, like IP address of the person who entered the particular message and message ID. There is also option to
edit and delete guest book entries [Fig 5].
When someone visits the guest book and wants to sign it he or she needs to use guest book
add screen, which is shown underneath [Fig 3].
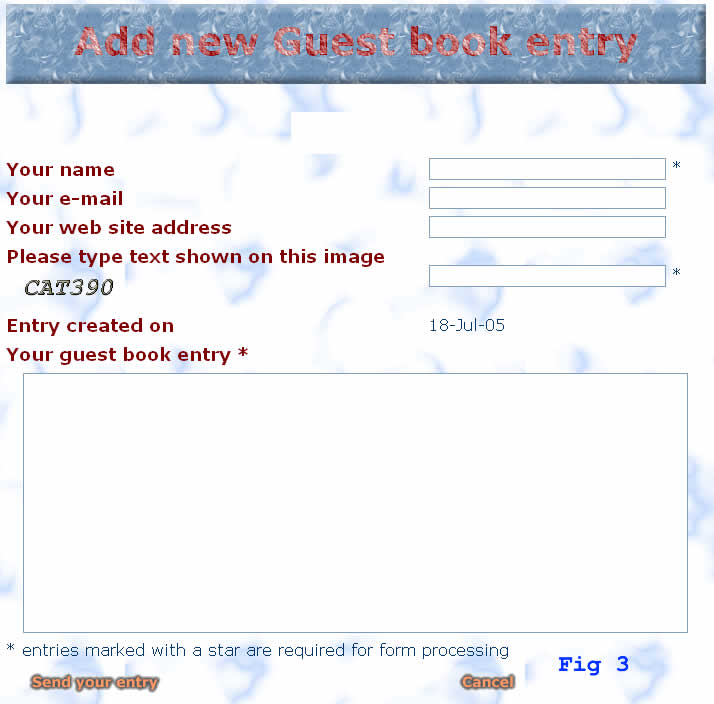 The add screen is accessed by the end user through the use of "New Guest Book Entry" buttons located at the top and bottom of the
main web page. User is required to fill in his name and the message he or she wants to add to the guest book.
All other fields are optional. The e-mail is checked for validity of format, no actual DNS check is performed. The web
site address is not checked for validity using DNS, however "http://" string is added if it is missing. The guest book
entry creation date is system generated and cannot be edited by the end-user.
The add screen is accessed by the end user through the use of "New Guest Book Entry" buttons located at the top and bottom of the
main web page. User is required to fill in his name and the message he or she wants to add to the guest book.
All other fields are optional. The e-mail is checked for validity of format, no actual DNS check is performed. The web
site address is not checked for validity using DNS, however "http://" string is added if it is missing. The guest book
entry creation date is system generated and cannot be edited by the end-user.
All guest book fields are filtered for HTML tags, HTML tags are not allowed in guest book for security reasons (script execution and playing with application look and feel). The administrator can choose to create a list of banned words (default list is provided). When a banned word is encountered inside a message, the message will not be recorded until offending word is removed. Another advanced option is a list of banned IP addresses. When someone attempts to enter a message into the guest book using banned IP address he will see error message and be prevented from entering his message.
If user submits his entry and it is invalid he or she will see an error message, shown in red. The user will have to modify his entry in order to comply with guest book rules before his message is accepted. Once the new entry is accepted the user is brought to the main web page where his message will appear at the top of the page provided "newest messages first" sorting was chosen by the guest book administrator.
When user enters his message one of randomly chosen images is shown with a text made up of three letters and three numbers. Users need to type the text they see on the image into the text area beside it. If they don't type correctly, then they cannot enter guest book entry. This feature is provided as a defense mechanism against automated message entry.
New messages are added to the first data file which has free space in it. If no data files have any free space, a new data file is created with a single message in it. Data files names are concatenation of the word "data" and a positive integer that increases by one with each subsequent data file. After the message is added to the data file it is also added to program's internal memory cache so changes are automatically reflected on the main view page.
This option is only available to guest book administrators that are logged into guest book. End-users
cannot edit any messages already entered into the guest book including their own. When administrator is
logged in he or she can edit every guest book message by clicking on the "Edit" button located under each
guest book entry. The edit message form, shown underneath [Fig 6] is very similar to the add message form, the main
difference being the pre-population of the edit form with already existing guest book entry.
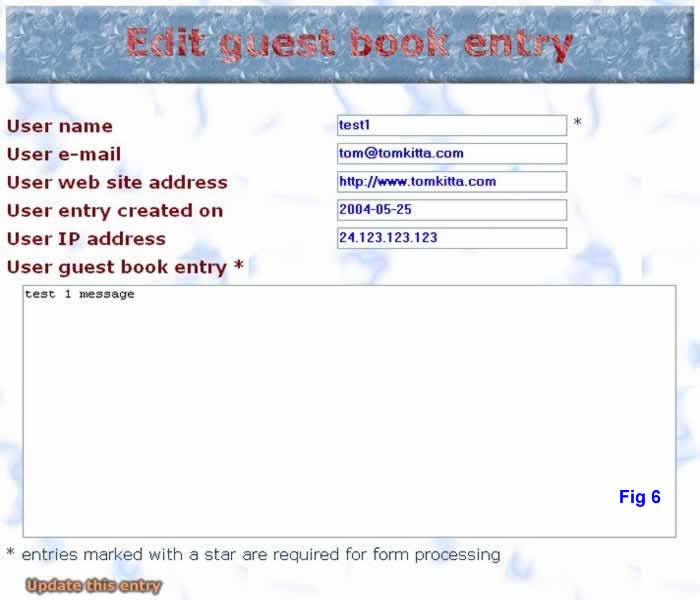
When administrator edits a message it is modified inside appropriate data file as well as memory cache. Changes made are immediately seen after they are made. All changes made using the edit form are subject to the same restrictions as end-user add message form.
This option is only available to guest book administrators that are logged into guest book. End-users
cannot delete any messages already entered into the guest book including their own. When administrator is
logged in he or she can delete every guest book message by clicking on the "Delete" button located under each
guest book entry. When "Delete" button is clicked, the delete acknowledgment form is show, pictured underneath [Fig 7].
Administrator can proceed with delete operation or cancel it. When the message is deleted from the guest book
using the delete form it is removed from memory cache and XML data file.
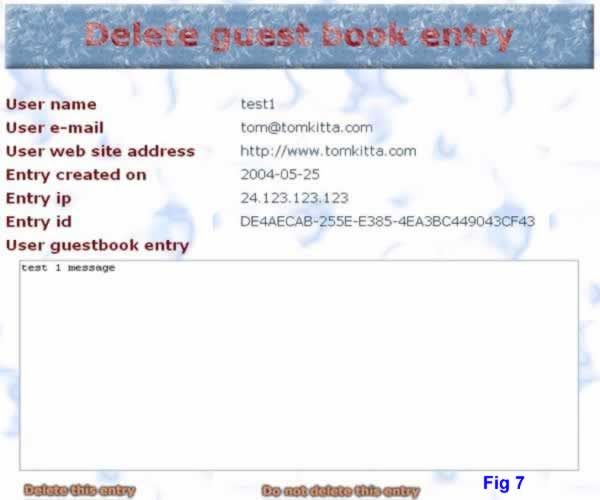
It is possible to delete all messages from a data file. If this occurs the data file will be empty. However, it will never get deleted.
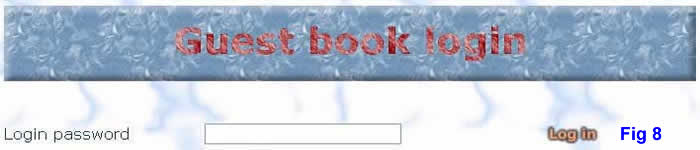
Since certain operations that can be performed on a guest book should be restricted to its owner, there is a need
for secure administrative area. The area is secured using a password login (for extra security you may set up https,
however, guest book is not considered a critical web application) shown on the picture [Fig 8].
 For methods used to access administrative area login form please refer to XML Guest book installation section.
Inside the configuration XML file the password is protected with one-way hash function.
For methods used to access administrative area login form please refer to XML Guest book installation section.
Inside the configuration XML file the password is protected with one-way hash function.
The default password is "admin" (without the quotes). Passwords are case sensitive. There is no user name provided, as there is only
one owner of the guest book and there is no user management. When administrator logs into guest book
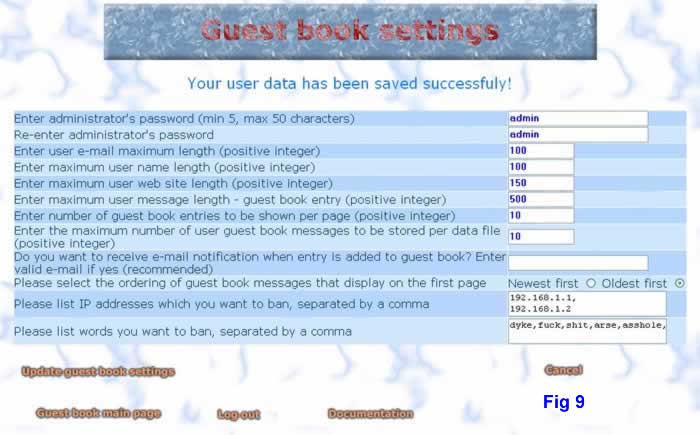
administrative area he or she is redirected to the guest book main view page enhanced with administrator only futures. On this page in addition to the end-user messages
he has the option to edit guest book settings using "Edit guest book settings" button. This brings the administrator to the
settings form shown on the picture [Fig 9].
In case you forget your administrator's password you can use supplied reset page, pwreset.cfm. You will need to open this file in your favorite text editor and uncomment reset code. Instructions are also provided inside password-reset file. You run the file once and your password is reset to "admin" (without the quotes) which is the default password. Since the passwords are hashed, there is no way to extract your original password.
On the settings form the administrator is presented with all user configurable options available. Options set by the administrator take effect only after the "Update guest book settings" button gets clicked. Here is a detailed explanation of what each option does:
When administrator clicks "Update guest book settings" button and all of his form entries are valid the guest book will inform him with a message on top of the entry form that his changes were accepted. If one or more of the entries is invalid, message on top of the form will indicate a problem and there will be error message under each form field that is invalid. Under administrative option settings form there is some information provided about the guest book data files (their names) as well as the total number of guest book entries stored in the guest book.
To modify graphics that XML Guest Books shows to the end user, as well as to the guest book administrator is vary easy. Thanks to the separation of content and presentation you will not be required to modify any ColdFusion programming code in order to make the guest book look the way you desire.
Most of the action takes place on the index.cfm page. This is the most complex page as far as display is concerned. All pictures are png, I like open source formats. The table is divided into three parts, using standard table tags. All you need to do is play around with them to achieve your needs.
By default there is only one CSS file for the whole guest book application.
The XML guest book uses caching to keep performance at acceptable levels. You may experience temporary slowdown once in a while (by default application scope refreshes every 2 days) for few seconds as the guest book re-initializes. There shouldn't be other slowdowns as everything is stored inside server's memory and thus response time is very fast. There shouldn't be any problems even with 1000's of guest book entries that are each 1000 characters in length. As for memory usage, 10000 messages each 1000 characters in length shouldn't use more than 20mb of server's memory. Most user's will never reach guest book entry numbers that are in 100000, so there is nothing to worry about.
Instead of using singe large guest book XML data file I opted out to use few smaller files. The reason for this is that reads of the whole guest book data are infrequent (say once every two days) while possible writes to it are more frequent as users enter messages and administrator possibly edits them. Also, it is more manageable when one does backup. In the remote event of file corruption you loose only part of the guest book (if you didn't back up).
There are three pages inside XML Guest Book whose purpose is to handle errors that application may throw.
You can contact the XML Guest Book developer at tom@tomkitta.com You can also visit XML Guest Book development web site at http://www.tomkitta.com
When reporting a bug in XML Guest Book, please submit as much information as you can about the problem. Screen shoots are very welcome as pictures sometimes do server as a substitute for 1000 words. Please refrain from just saying "it doesn't work" without providing any further explanation of the problem.